Raising a bird at home starts with three decisions made before you bring the bird home: choosing a species that genuinely fits your daily life, setting up a safe and stimulating habitat, and committing to a welfare-first routine covering diet, handling, and vet care. Get those three things right and everything else, from bonding to training to troubleshooting, becomes much more manageable. Whether you're starting with a hand-tame baby parrot from a breeder or you've found yourself caring for a rescued bird, this guide walks you through the full process in the order you actually need it.
How to Raise a Bird at Home: Welfare-First Guide

Maya Harris
13 May 2026
Choosing the right bird species for home care
The CDC puts it plainly: choose a bird whose attitude, temperament, size, activity level, and life span all fit your lifestyle. That last one is easy to overlook. A cockatiel lives 15 to 25 years. An African grey or a macaw can outlive you. A budgerigar or a canary is a far lower commitment and still deeply rewarding, especially for first-time owners. Think honestly about noise tolerance in your home, how many hours per day the bird will be unsupervised, your budget for quality food and avian vet care, and whether you want a hands-on companion or a bird you enjoy mostly by watching.
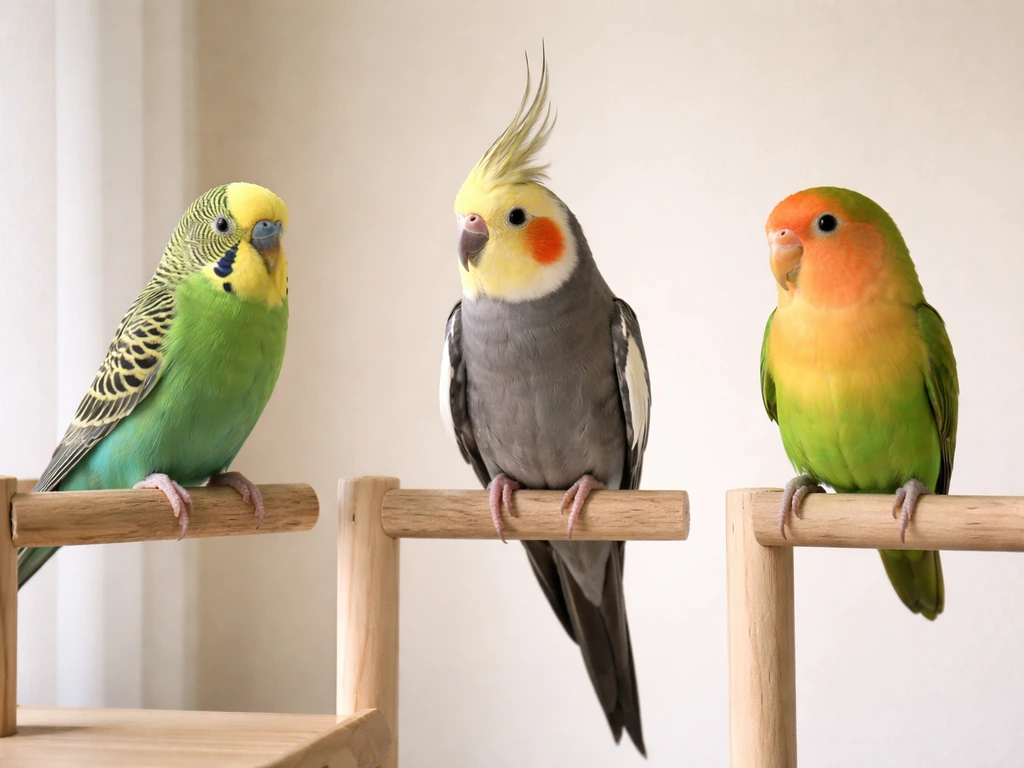
For most beginners, budgerigars, cockatiels, and lovebirds are the practical starting point. They are small, relatively forgiving of first-time handling mistakes, and their nutritional and housing needs are well-documented. Larger parrots like conures, caiques, and Amazons are better suited to owners who have already kept and bonded with a smaller bird. Corvids, raptors, and most wild-caught species fall into a completely separate legal and welfare category covered later in this guide.
If you are caring for a found or rescued bird rather than choosing a pet, pause here. Wild native birds in the U.S. are protected under the Migratory Bird Treaty Act, and your obligation is almost certainly to get that bird to a licensed rehabilitator, not to raise it yourself. The legal and ethical section below covers this fully. For a rescued bird you intend to keep as a pet because it genuinely cannot be released, you still need the right species-specific setup, which is why everything in this guide applies to both situations.
Setting up a safe home habitat and essentials
Cage size, bar spacing, and placement
The Association of Avian Veterinarians (AAV) and the Merck Veterinary Manual agree on the minimum: the cage must be at least 1.5 times the bird's wingspan in every direction so the bird can stretch its wings fully and move around without clipping feathers on the bars. The MSPCA recommends going to 2 times wingspan when possible, and honestly, bigger is always better. Bar spacing is equally critical: the bird must not be able to fit its head through the bars. A practical test from MSPCA: if your fingers fit between the bars, the spacing is wrong for that bird.
Placement matters as much as cage size. Position the cage in a well-lit room with regular household activity so the bird stays socially engaged, but avoid the kitchen entirely. Overheated PTFE nonstick cookware releases fumes that can kill a bird within minutes because birds have an extraordinarily sensitive respiratory system. The cage should sit at roughly eye level for people in the room, away from drafts, direct air conditioning vents, and direct all-day sun. A consistent ambient temperature between 65 and 80 degrees Fahrenheit works for most companion species.
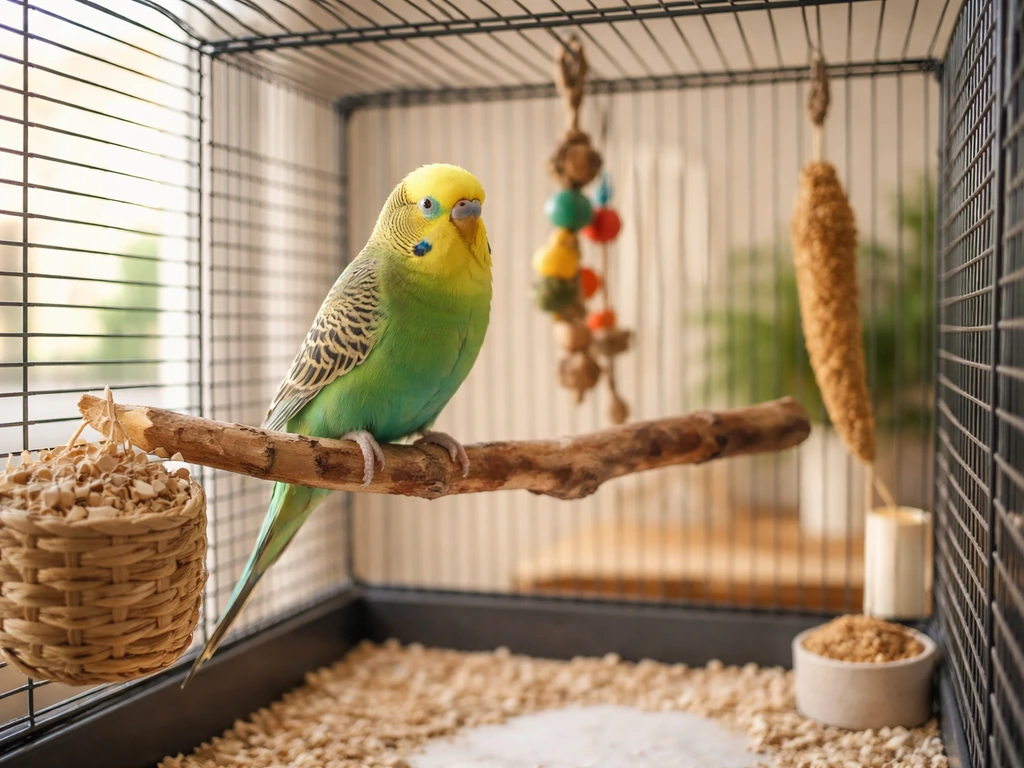
Perches, enrichment, and daily setup
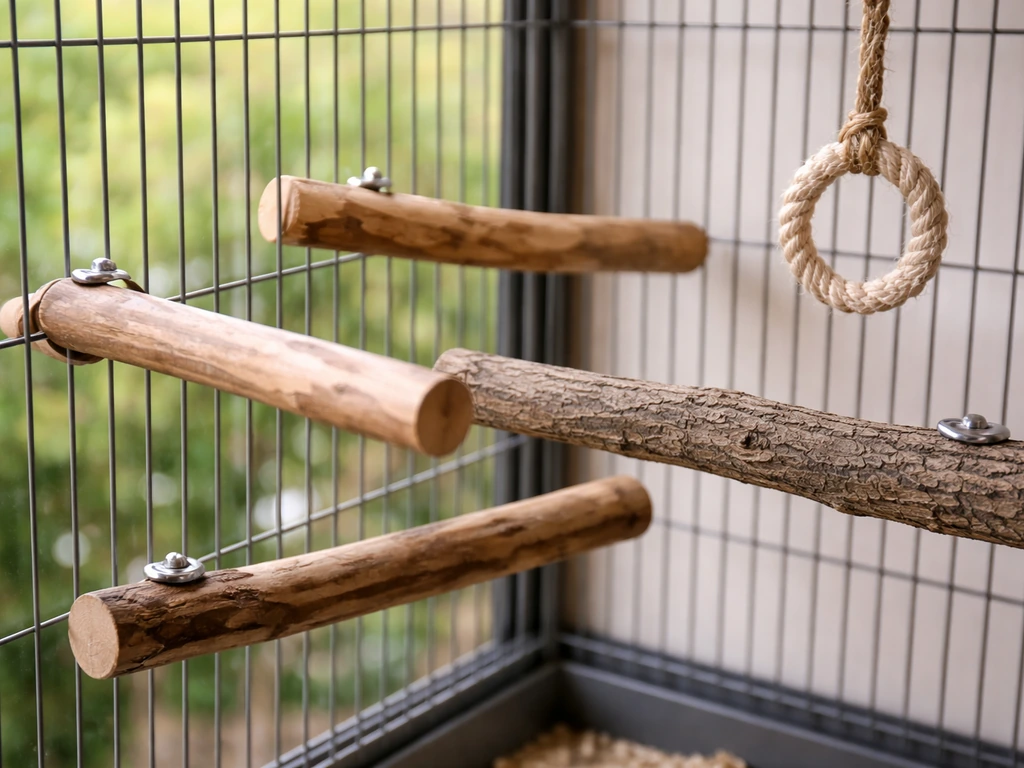
Provide at least two to three perches of varying diameter and texture so the bird's feet work different muscle groups every day. Natural wood perches from safe, pesticide-free species like manzanita or apple wood are ideal. Avoid dowel perches as the sole option: uniform diameter causes pressure sores on the feet over time. Add foraging toys, shreddable toys, and puzzle feeders appropriate to your species. Enrichment is not optional; boredom is a direct driver of feather-destructive behavior and stress vocalizations.
- Cage at minimum 1.5 times wingspan in all directions (bigger is always better)
- Bar spacing small enough that the bird cannot fit its head through
- Minimum two to three perches of varying diameter and material
- Foraging toys, shreddable items, and species-appropriate puzzle feeders
- Placement away from kitchen, drafts, and direct all-day sun
- Fresh water available at all times; water dish washed daily with soap and hot water
- Cover the cage partially at night to signal a 10 to 12 hour sleep period
Diet and feeding schedule basics
Seed-only diets are one of the most common causes of malnutrition in companion birds. Seeds are high in fat and deficient in critical nutrients. A well-designed diet for most small companion parrots follows the breakdown recommended by Merck: roughly 40 to 50 percent high-quality formulated pellets, 30 to 40 percent a varied seed mix, 10 to 15 percent fresh vegetables, and 5 to 10 percent fruit. Pellets should form the nutritional foundation, not the treat. Fresh vegetables and fruit are valuable but mostly water, so they cannot replace the nutrient density of a good formulated pellet even when offered in large amounts.
If you are transitioning a bird from a seed-only diet to pellets, do it gradually and ideally under avian vet guidance. IVIS notes that birds may not recognize new food as food right away, so mixing pellets with familiar seeds and slowly increasing the pellet ratio over several weeks is the standard approach. Weigh the bird weekly during a diet transition to catch any unintended weight loss early.
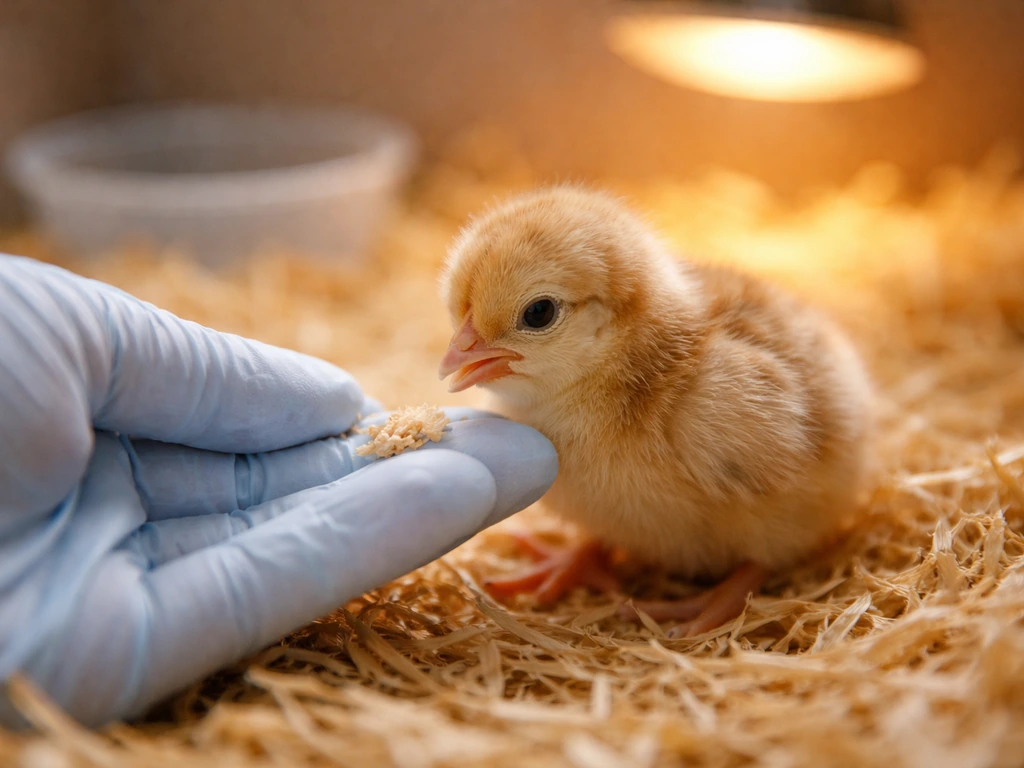
For anyone hand-feeding a baby bird or a rescued fledgling, the stakes around feeding are much higher. If you are hand-rearing or hand-feeding, double-check that you are using the correct formula, temperatures, and pacing so you do not overfill or stress the crop. Always check the formula temperature with a thermometer before every feeding. Palpate the crop gently before each feeding to confirm it has emptied from the last meal before adding more.
Overfeeding causes regurgitation and aspiration pneumonia, which is one of the most common reasons hand-raised babies die unnecessarily. If you are in this situation, the guides on how to hand feed a bird and how to hand raise a bird cover the full technique and weight-monitoring process in detail.
| Food Category | Recommended Share of Diet | Notes |
|---|---|---|
| Formulated pellets | 40–50% | Primary nutrition source; species-appropriate size and formula |
| Seed mix | 30–40% | Variety preferred; avoid sunflower-heavy mixes as the sole seed option |
| Fresh vegetables | 10–15% | Leafy greens, peppers, squash; wash thoroughly |
| Fresh fruit | 5–10% | Offer in moderation due to sugar content |
| Unsafe foods (never offer) | 0% | Avocado, onion, chocolate, caffeine, alcohol, xylitol, raw garlic |
Offer fresh food twice daily, morning and early afternoon, and remove uneaten fresh food within two to four hours to prevent bacterial growth. Pellets and a small seed portion can stay available most of the day. Always provide fresh, clean water and wash the water dish daily with soap and hot water as the AAV recommends.
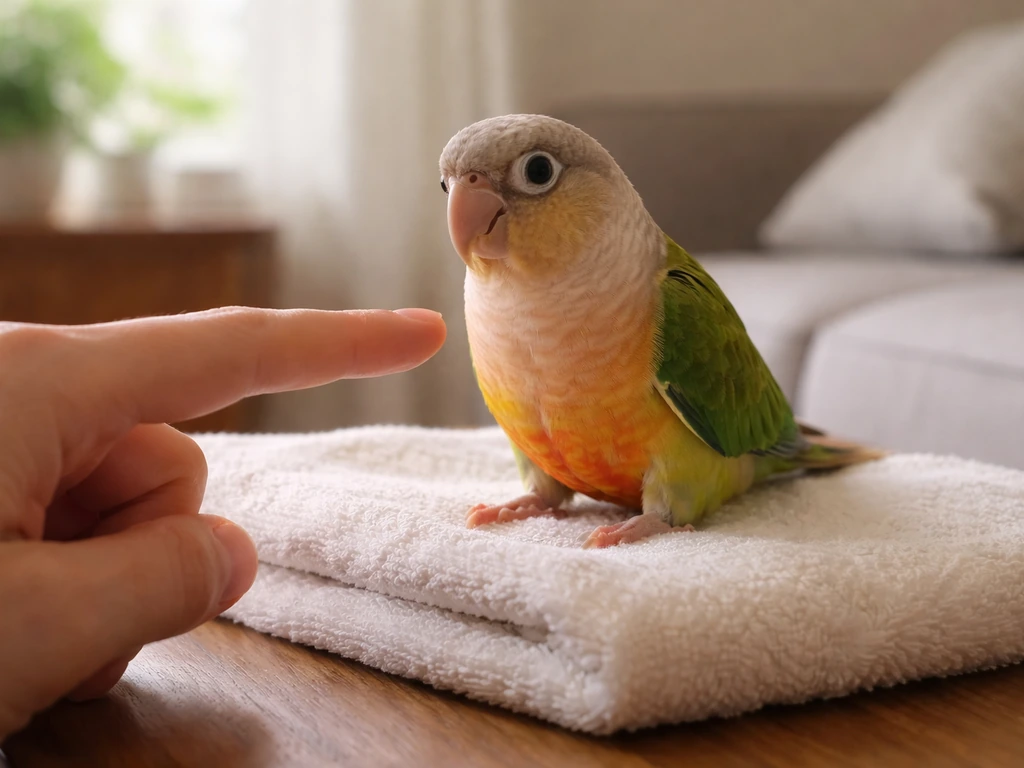
Handling, bonding, and humane taming steps
The single most important principle in bonding with any bird is that trust is built slowly and never forced. A new bird needs at least two to three days of quiet observation time in its cage before you begin any direct interaction. Sit near the cage, speak softly, move slowly, and let the bird get used to your presence without pressure. Many birds that appear aggressive or fearful in the first week settle considerably by the end of the second week once they realize nothing bad happens when you're nearby.
When you do start handling, keep sessions short, five to ten minutes maximum in the early stages, and always end on a calm note before the bird shows signs of stress. Watch for flattened feathers held tight against the body, rapid breathing, biting attempts, or freezing in place. These are stress signals, not stubbornness. Back off, give the bird space, and try again later. Avoiding this kind of pressure is what separates welfare-first taming from the old force-based methods that damage trust.
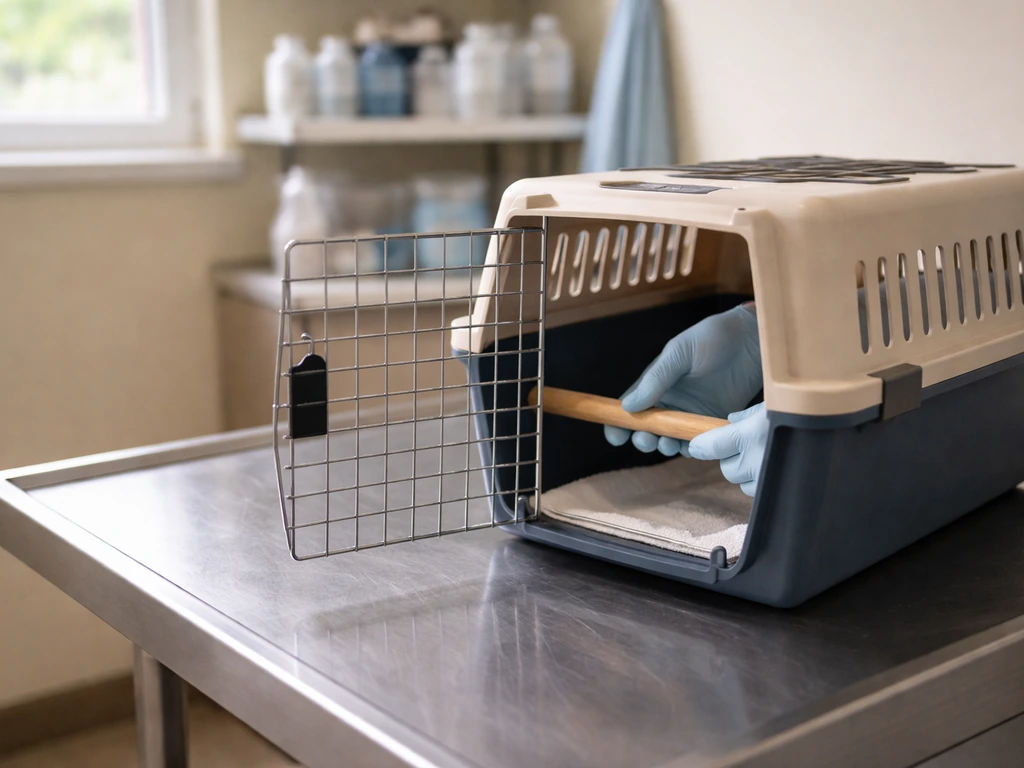
When restraint is genuinely necessary, such as for a health check or nail trim, Purdue University's veterinary guidelines are clear: never compress the chest. Birds breathe by expanding their chest wall, and tight restraint around the body can cause respiratory failure within minutes. Use a light towel to gently wrap the wings, support the body, and keep the head still. Practice this skill with guidance from your avian vet before you need it in an emergency.
A gentle bonding progression for beginners
- Days 1 to 3: Sit quietly near the cage, speak softly, make no sudden movements. Let the bird watch you.
- Days 4 to 7: Begin offering a small, high-value treat through the cage bars with a calm, extended hand. Do not push if the bird retreats.
- Week 2: Open the cage door and offer the treat from just inside the door. Do not reach in far.
- Week 2 to 3: Practice the step-up cue (see training section) from inside the cage, rewarding immediately.
- Week 3 onward: Gradually increase out-of-cage time in a bird-proofed room, always in low-distraction conditions.
Training for recall, stepping up, and basic behaviors
Step-up is the first behavior every companion bird should learn, and Lafeber describes the method clearly: hold a finger or hand perch horizontally just above the bird's feet and say a consistent cue, 'Step up,' in a calm, even tone. Apply gentle upward pressure to the lower belly just above the feet. The moment the bird steps on, reward immediately with a small treat and verbal praise. Repeat in very short sessions, three to five repetitions maximum, multiple times per day. Consistency of the cue and immediacy of the reward are what make this stick.
Target training is the next tool to add. The AAV describes it as a positive reinforcement method where the bird learns to touch a target (typically a small stick or chopstick tip) with its beak to earn a reward marked by an immediate sound cue, usually a click, followed by the treat. Target training gives you a way to move the bird, position it, and later build more complex behaviors without any force. It is especially useful for birds that are not yet comfortable stepping onto hands.
Recall training, teaching the bird to fly to you on cue, follows naturally from step-up once the bird is reliably stepping up and comfortable with out-of-cage time. Start at very short distances in a small, enclosed, bird-proofed room. Use a consistent recall word paired with an outstretched arm, and reward every successful return generously. Never punish a bird that does not return immediately. Recall takes weeks to months to become reliable and is one of the most important safety behaviors a home bird can have.
PetMD recommends teaching 'Step up' and 'Step down' as separate, distinct cues with separate reinforcement patterns. This distinction matters: a bird that knows both cues is much safer to handle and transition between perches, carriers, and human hands without confusion or accidental flight.
Troubleshooting common problems
Biting and fear-based aggression
Biting almost always means the bird felt it had no other option to communicate discomfort. Review your approach: are sessions too long, too close, too fast? Go back to an earlier stage in the bonding progression and rebuild from there. Never flick, yell at, or restrain a bird in response to a bite. It destroys trust and usually escalates the behavior. A calm, neutral reaction followed by removing attention for 30 seconds is far more effective.
Refusal to eat or diet transition problems
A bird that refuses new food is almost always experiencing it as unfamiliar, not dangerous. Try offering the new food on a white dish (bright contrast helps some species), eating in front of the bird yourself, or placing the new food in the foraging toy where the bird already searches for treats. If a bird genuinely stops eating for more than 24 hours, especially during a diet transition, contact your avian vet. Weight loss in small birds can become critical very quickly.
Feather picking and stress behaviors
Feather-destructive behavior is one of the most distressing problems bird owners face. Merck is clear that feather picking can have medical causes including systemic illness, infections, cancer, malnutrition, and toxin exposure, and it can also have behavioral causes including stress, boredom, and sexual frustration. You cannot tell which it is by looking. If you see feather picking, the first call is to your avian vet to rule out medical causes before attempting any behavioral intervention. UC Davis notes that the resulting skin damage can lead to secondary infections, making prompt attention important.
Noise, regression, and enrichment shortfalls
Excessive vocalization and behavioral regression, a previously calm bird becoming fearful or nippy again, are usually triggered by a change in routine, insufficient out-of-cage time, inadequate enrichment, or a health issue the bird is masking. Birds are excellent at hiding illness, as Merck notes, so any sudden behavior change warrants both a routine and an environmental review plus a vet check if the change persists more than a few days.
Health, common problems, and when to see an avian vet
Every bird you keep at home should have a baseline exam from an avian-experienced vet within the first two weeks of arrival and annually after that. The CDC explicitly recommends working with an avian-experienced veterinarian as a core component of keeping pet birds healthy. General practice vets often have limited bird-specific training, so look specifically for an avian vet or a vet with documented avian experience.
Birds mask illness instinctively as a survival mechanism. By the time a bird looks obviously sick, it has usually been ill for a while. Watch for early, subtle signs rather than waiting for obvious collapse.
- Fluffed feathers held for extended periods outside of brief rest
- Tail-bobbing or labored breathing at rest
- Discharge from nostrils or eyes
- Changes in droppings lasting more than 24 hours (color, consistency, volume)
- Loss of interest in food or significant weight loss
- Crop that remains full when it should have emptied (crop stasis)
- Feather destruction or new bald patches
- Sudden behavior change, extreme lethargy, or inability to perch
- Any suspected toxin exposure, including nonstick fumes or household chemicals
Crop stasis, where the crop fails to empty between feedings, is a medical emergency in hand-fed babies and a serious concern in adults. If the crop remains distended when it should be empty, if the bird is weak or breathing heavily alongside a full crop, that is an urgent vet visit, not a watch-and-wait situation.
Legal, ethical, and welfare guidelines for pets vs rescue and wild birds
This section matters more than most people realize, especially if a wild or injured bird has come into your care. In the United States, the Migratory Bird Treaty Act (16 U.S.C. 703 to 712) is the federal law that protects most native wild birds. Under this law, taking, possessing, or transporting migratory birds without a federal permit is illegal, regardless of your intentions. This covers the vast majority of songbirds, raptors, waterfowl, and many other species you might encounter. The law is not a technicality; it exists because wild birds kept in home settings, even with the best intentions, have significantly worse outcomes than birds handled by licensed rehabilitators.
If you find an injured or orphaned wild bird, the correct action is to contact a licensed wildlife rehabilitator or your state fish and wildlife agency the same day. If you want to raise a wild bird, start by contacting a licensed wildlife rehabilitator right away rather than trying to keep it at home injured or orphaned wild bird. The U.S. Fish and Wildlife Service rehabilitation permit framework requires that all releasable, recuperated birds be released to appropriate wild habitat as soon as seasonal conditions allow. That obligation falls on licensed rehabilitators, not private individuals, and it reflects the ethical principle that wild birds' welfare is best served by returning them to the wild.
Pet birds sold through legal channels, meaning captive-bred and legally traded species, operate under a completely different set of rules. Common companion species like budgerigars, cockatiels, and most parrots sold through licensed breeders or pet stores are not covered by the MBTA and can be legally kept as pets. Some species, however, including African grey parrots and certain cockatoos, are protected under international CITES regulations, and you may need documentation of legal acquisition. When in doubt, ask for written provenance documentation from the seller before purchase.
Ethical welfare obligations do not stop at legal compliance. A bird kept at home deserves appropriate social interaction, mental stimulation, species-appropriate diet, regular vet care, and a habitat that allows natural behaviors. Keeping a bird in a cage that is too small, feeding a seed-only diet, or isolating it without enrichment all constitute welfare failures even when technically legal. If at any point you cannot meet a bird's welfare needs, rehoming through a reputable bird rescue or adoption network is always the more ethical choice than continued neglect, even unintentional neglect.
| Situation | Legal Status (U.S.) | Recommended Action |
|---|---|---|
| Found injured wild songbird or raptor | MBTA protection applies; possession illegal without permit | Contact licensed wildlife rehabilitator immediately |
| Found fledgling that appears to have left nest early | Same MBTA protection | Leave in place if uninjured; contact rehabilitator if clearly injured or truly abandoned |
| Captive-bred parrot from licensed breeder | Legal to keep as pet | Standard pet ownership with welfare obligations |
| Internationally protected species (e.g., African grey) | CITES-regulated; legal if properly documented | Request and keep documentation of legal acquisition |
| Non-releasable wild bird with licensed rehabber | Rehabber holds permit; bird stays with rehabber | Not a home-pet situation unless you hold appropriate permits |
Your daily routine and next steps
A consistent daily routine is one of the best things you can give a bird. Birds are highly attuned to schedules and thrive when feeding, sleep, out-of-cage time, and training happen at predictable times. Here is a practical framework to start with today and adjust as you learn your specific bird's preferences.
- Morning: Uncover the cage, offer fresh water (wash dish first), provide fresh vegetables and a small morning fruit portion alongside pellets.
- Morning to midday: First training session, five to ten minutes of step-up practice or target training using high-value treats.
- Early afternoon: Supervised out-of-cage time in a bird-proofed room, 30 to 60 minutes minimum. Remove uneaten fresh food from the cage.
- Afternoon: Second short training session. Introduce any new enrichment or foraging activity.
- Early evening: Final fresh food offering, check water, spot-clean cage floor and perch surfaces.
- Evening: Wind down household activity near the bird. Cover the cage at a consistent time to allow 10 to 12 hours of undisturbed sleep.
Your immediate next steps are straightforward. If you have not yet chosen a bird, research two or three species that match your lifestyle using the criteria above and consult with an avian vet before purchasing. If you already have a bird, book a baseline vet exam if you have not had one recently, audit the cage size and enrichment against the guidelines here, and evaluate the current diet against the pellet-to-seed-to-fresh-food ratio. Then start the bonding progression from the beginning, even if you have had the bird a while, because there is never a wrong time to rebuild trust properly.
Raising a bird well is genuinely not complicated, but it does require consistency. This section on raising a bird can help you map out daily habits for feeding, bonding, and training in a way that supports long-term welfare. The birds that thrive in home settings are almost always the ones whose owners committed to learning before there was a problem rather than scrambling afterward. Start with the habitat and diet, add training once the bird is settled, and let the relationship build at the bird's pace. To learn the step-by-step basics of hand-raising, see how to hand raise a bird. That approach works for every species, every age, and every starting point.
FAQ
If I already have a bird, how long should I pause before trying to train or handle it again?
Start by planning your first 7 to 14 days as a “no surprises” period. Keep the room calm, maintain the same feeding and lighting schedule daily, and handle only for short step-up sessions after your initial quiet observation period. If you need to travel or have guests, pre-decide how you’ll reduce stress (for example, keep the cage in the same spot, avoid moving it, and ensure the bird still gets consistent meals and rest).
What should I look for if my home noise level is too high for my bird?
Do not rely on what you hear. For example, some homes are noisy without being “loud” in one spot, so the key is to watch your bird’s response during the day, especially after changes. If vocalization ramps up for hours daily, or you see stress signals (puffed feathers held tight, tail bobbing with agitation, repeated biting), reassess habitat placement, sleep darkness, and enrichment before adding more handling.
How do I avoid common perch mistakes that can harm a bird’s feet?
Use the cage as the baseline, then add perches and toys intentionally. A common mistake is placing all perches at the same height or only offering one type of surface, which encourages pressure points and foot problems. Vary perch diameters (small, medium, larger) and textures, and ensure the bird can move between at least two or three levels without climbing through the same narrow bar area.
How strict do I need to be about removing uneaten fresh food, and what’s the best practice?
When you remove uneaten fresh food after 2 to 4 hours, also discard anything that has been sitting wet or has been repeatedly touched by the beak. Replace with fresh portions, even if there is “some left,” because bird saliva speeds up bacterial growth. If your bird is a slow eater, reduce portion size rather than stretching the time window.
Can I transition diet and start training at the same time without stressing my bird?
Yes, but do it in a controlled way. Change lighting and sleep schedule first, then diet. If you must switch both, start with the diet change during the week you can monitor weight and droppings closely. Keep the bird on a consistent nighttime darkness period so stress does not mask appetite problems.
What if my bird refuses pellets for weeks, how do I know whether to push or get help?
If you are dealing with a picky eater, the fastest useful decision aid is to track weight and acceptance. Offer the new food at the same times daily, use small amounts on a contrasting dish, and mix briefly with a tiny portion of familiar seed. If the bird loses weight, stops eating pellets entirely, or shows any illness signs, switch to avian vet guidance rather than “pushing through.”
How do I keep temperature and airflow safe in real homes (not just in ideal setups)?
Birds can overheat quickly from the household environment. Avoid direct sunlight on the cage, keep the cage away from heaters, and prevent airflow from drying vents. If you use humidifiers, do not place them near the cage airflow directly, and ensure the bird always has a comfortable micro-location to move to if humidity or temperature changes.
When do I need to see an avian vet sooner than the next scheduled annual exam?
A good rule is to never stop at one annual check, especially after any behavior change. If you notice a new pattern such as increased biting, quieter vocalization, reduced preening, or persistent regurgitation, schedule an avian vet visit even if it is “not time yet.” Birds hide illness, so waiting for the next routine appointment can cost time.
What’s the best way to respond the next time my bird bites, so it doesn’t get worse?
If you suspect a bite was defensive or stress-related, use a “reset” response. End the interaction immediately, step back, and give a short quiet break, then try again later at a lower-pressure distance or shorter session. Avoid any immediate punishment, and only increase difficulty when the bird shows relaxed body language (loose posture, normal breathing, interest without lunging).
What indicators should I monitor during a diet transition besides just appetite?
For any diet change, you want weight, crop quality, and droppings to guide you. Weigh weekly, and after transitions start to ensure droppings stay consistent in frequency and moisture. If you are hand-feeding a baby, weight monitoring is not optional, and any signs of crop delay or abnormal breathing require urgent veterinary input.
I found a bird outside, what should I do first, and how do I know whether it’s legal to keep?
Start with immediate safety and welfare, then legality. If the bird is a native wild bird you did not obtain through legal channels, contact a licensed wildlife rehabilitator the same day, and do not attempt to “raise it” at home while waiting. If you believe it may be legally held as a pet species, ask the seller or documentation for provenance in writing before you proceed with care decisions that assume captive-bred status.
Is “step down” really necessary, and how can I teach it safely?
Yes. Use step-down training as a separate cue, then practice it only when the bird already understands step-up on cue. If the bird is not reliably stepping calmly, focus on step-up and out-of-cage comfort first, in short sessions. This prevents confusion during handling and reduces accidental flight risk when moving between perches or carriers.
Next Article
How to Hand Rear a Bird Humanely Step by Step
Humane step-by-step guide for hand-rearing baby pet or wild birds: brooder setup, safe feeding, troubleshooting, weaning