Harness training a bird means teaching it to calmly accept wearing a fitted harness or vest so you can take it outside safely for enrichment, bonding, or fresh air. The process works through gradual desensitization and positive reinforcement, never force, never rush. Most parrots and some other pet birds can learn to tolerate a harness comfortably, but it takes weeks of short, positive sessions before you ever clip on a leash and step out the door.
How to Harness Train a Bird Safely Step by Step

Maya Harris
23 Apr 2026
Before we dive in, it's worth being clear about what this guide covers: harness wearing and safe, controlled outdoor movement. This is not about teaching flight on command or performing tricks. Many people search for how to flight-train a bird, but harness training is really about safe, controlled outdoor movement rather than teaching flight on command how to flight train a bird. If you want to build the foundational handling skills that make harness training easier, target training, stick training, and recall training are all great companion skills to develop alongside this work. If you are specifically looking for how to clicker train a bird for harness work, keep reading for a simple approach to pairing cues with treats how to flight train a bird. For best results, many owners also teach stick training alongside harness training so their bird has a reliable way to step forward and participate calmly.
Choosing the right bird harness and fit
Getting the right harness before you start training is non-negotiable. A poor fit causes discomfort, restricts breathing, and can seriously set back your progress or injure your bird. The good news is that measuring is straightforward if you know what to measure.
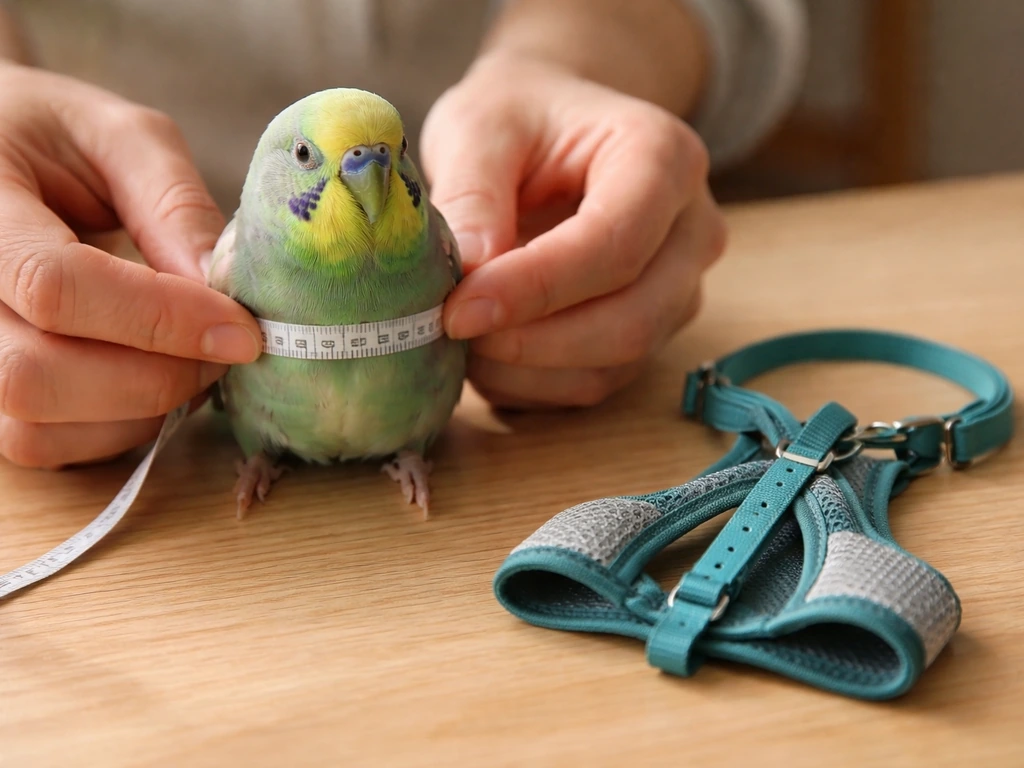
You need three key measurements. First, take the girth: wrap a soft ribbon or piece of string around your bird's body just under the wings and just above the base of the tail. Second, measure nape-to-tail length from the back of the neck down to the base of the tail. Third, get the underside measurement from the shoulder, under the body, through the legs to the vent. Write all three down and match them to the sizing chart for your chosen harness brand, because sizing varies between manufacturers like Aviator and Avian Fashions.
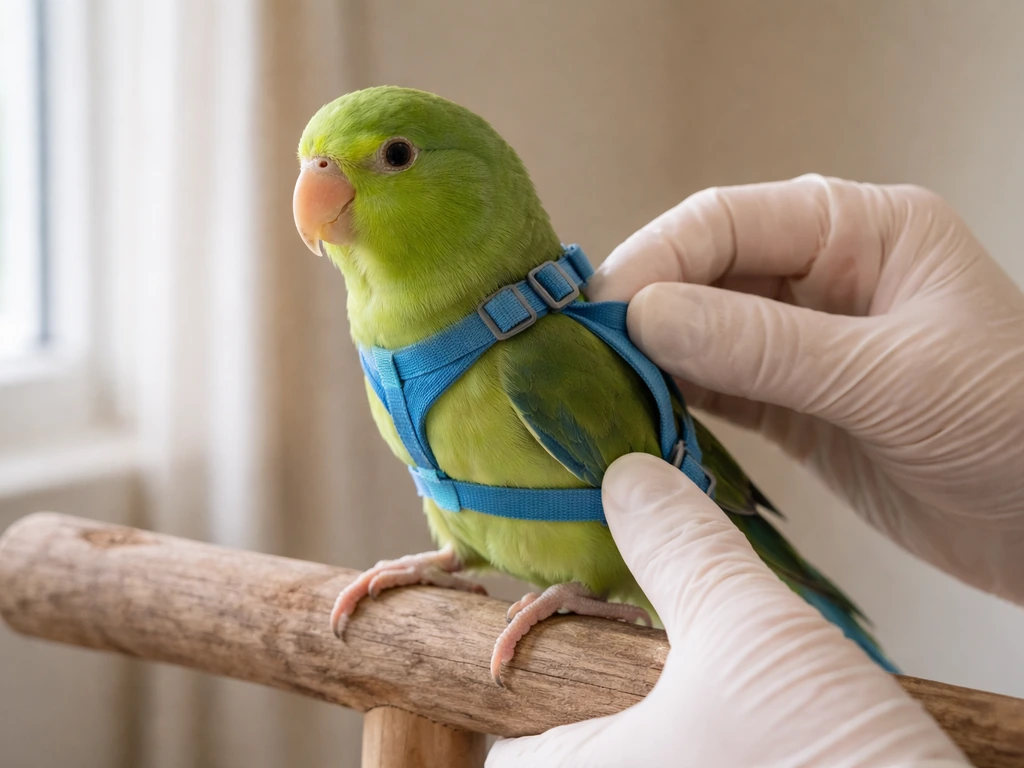
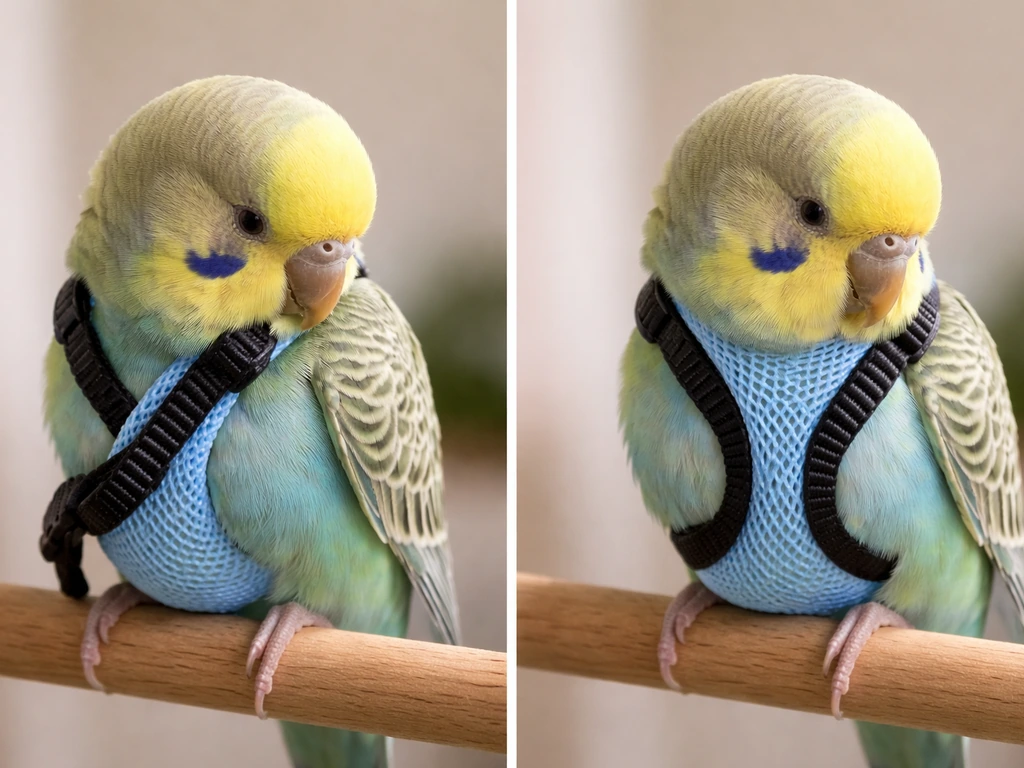
A correctly fitted harness should sit snug enough that it cannot slip over your bird's head, but loose enough that you can slide one or two fingers underneath the body straps. It must not rub the skin, twist, press on the throat, or restrict normal chest movement during breathing. Merck Veterinary Manual also advises minimizing restraint time, moving slowly while talking quietly, and observing respiratory rate and effort before manual restraint, while leaving the thorax and abdomen free so the chest can expand for breathing restricts breathing. If your bird's chest is visibly compressed or it seems labored to breathe, the harness is too tight. Most reputable harness brands offer a fit exchange program, so don't be afraid to size up or down after the first fitting.
Stick to purpose-built bird harnesses from reputable brands. DIY solutions and improvised restraints carry real risks including entanglement, pressure injuries, and toxic materials. The Aviator Harness, Avian Fashions' Avian Adventure, and similar designs are built with bird-safe materials, breakaway logic, and tested geometry. They're worth the investment.
| Harness Type | Best For | Key Consideration |
|---|---|---|
| Figure-8 slip harness (e.g., Aviator) | Parrots from conure to macaw size | Requires more handling dexterity to put on; very secure when sized right |
| Vest-style harness | Smaller birds; birds sensitive to over-the-head fitting | Easier on/off but may need more adjustment to prevent twisting |
| Flight suit/diaper harness | Birds in-home; not for outdoor flight | Primarily for hygiene containment; not a substitute for a leash harness outdoors |
Safety first: when harness training is (and isn't) appropriate
Harness training is a great tool for many pet parrots, but it is not appropriate for every individual bird. Being honest about whether your specific bird is a good candidate will save you both a lot of stress.
Harness training is generally appropriate for tame, handleable pet parrots that are comfortable being touched on the body, tolerate mild restraint, and respond well to positive reinforcement. Birds that already enjoy handling and target training typically adapt much faster. It can also be a meaningful enrichment tool for larger, longer-lived species like African greys, cockatoos, Amazons, macaws, eclectus parrots, caiques, and many conure species.
It is generally not appropriate, or requires much more careful individual assessment, in the following situations:
- Birds that panic severely during toweling or any form of hand restraint
- Birds with respiratory issues, heart conditions, or other medical fragility
- Birds that become dangerously overstimulated in outdoor environments
- Wild or rehabilitation birds (more on this in the species section below)
- Very young chicks still in the developmental weaning phase, unless you are an experienced breeder starting very early in a structured program
- Birds that have never been tamed to basic handling — harness training requires a handling foundation first
If you are ever unsure whether your bird is medically suitable, talk to an avian vet before starting. Stress has measurable physical effects on birds, and a harness training program that goes badly can temporarily suppress immune function and worsen underlying conditions.
Step-by-step acclimation: desensitization and counterconditioning
The whole philosophy here is: go slower than you think you need to. Every step should be comfortable and paired with something your bird genuinely likes, whether that is a favorite treat, praise, or brief play. You are building a positive emotional association with the harness, not just teaching a behavior.
This process is best thought of in stages. Do not advance to the next stage until your bird is completely calm and relaxed at the current one. That might mean spending three days on Stage 1 or three weeks. Both are normal.
- Stage 1 — Harness in the room: Bring the harness out during a positive activity like eating or playing. Let your bird see it without doing anything with it. Treat and praise. Repeat for several sessions until there is zero stress response to the harness being present.
- Stage 2 — Harness in your hand near the bird: Hold the harness calmly near your bird. Move it slightly, let it make its natural rustling sound. Pair every exposure with a high-value treat. If the bird lunges away or shows stress, you've moved too fast — back up and slow down.
- Stage 3 — Touching the harness to the bird's body: Gently touch the harness to the bird's chest, back, or wing area without attempting to put it on. Treat immediately. Keep sessions to two to three minutes maximum at this stage.
- Stage 4 — Introducing the head loop: For figure-8 style harnesses, hold the head loop open and let your bird voluntarily put its head near or through it for a treat. Never push the head through. Lure the bird's head through with a treat held on the other side. This stage can take one to three weeks for some birds and that is completely fine.
- Stage 5 — Full harness on briefly: Once the head loop is comfortable, gently and quickly thread the wings and clip the body straps. Treat immediately and remove within seconds. Gradually extend the time the harness stays on over many sessions.
- Stage 6 — Moving with the harness on: Once your bird is comfortable wearing the harness for several minutes indoors, attach the leash and practice moving together in a safe indoor space before any outdoor outing.
Counterconditioning means that every time something mildly uncomfortable (the harness) appears, something great (a treat) follows. Over time, your bird stops dreading the harness and may even show anticipation for the session. That attitude shift is the goal, and it only comes from consistent, low-pressure repetition.
Teaching comfortable harness on/off and loose-leash behavior
The on/off routine is a skill in itself. Practice removing the harness as carefully as you practice putting it on. Fumbling, pulling, or rushing the removal can undo weeks of good progress. Slow, smooth, predictable movements are everything here.
When putting the harness on, narrate gently in a calm voice if your bird is used to verbal cues. Some trainers use a specific cue word like 'harness time' before each session. Pair this cue with treats before the harness even comes out, so the word itself becomes a predictor of good things. Over time, hearing the cue reduces anticipatory stress.
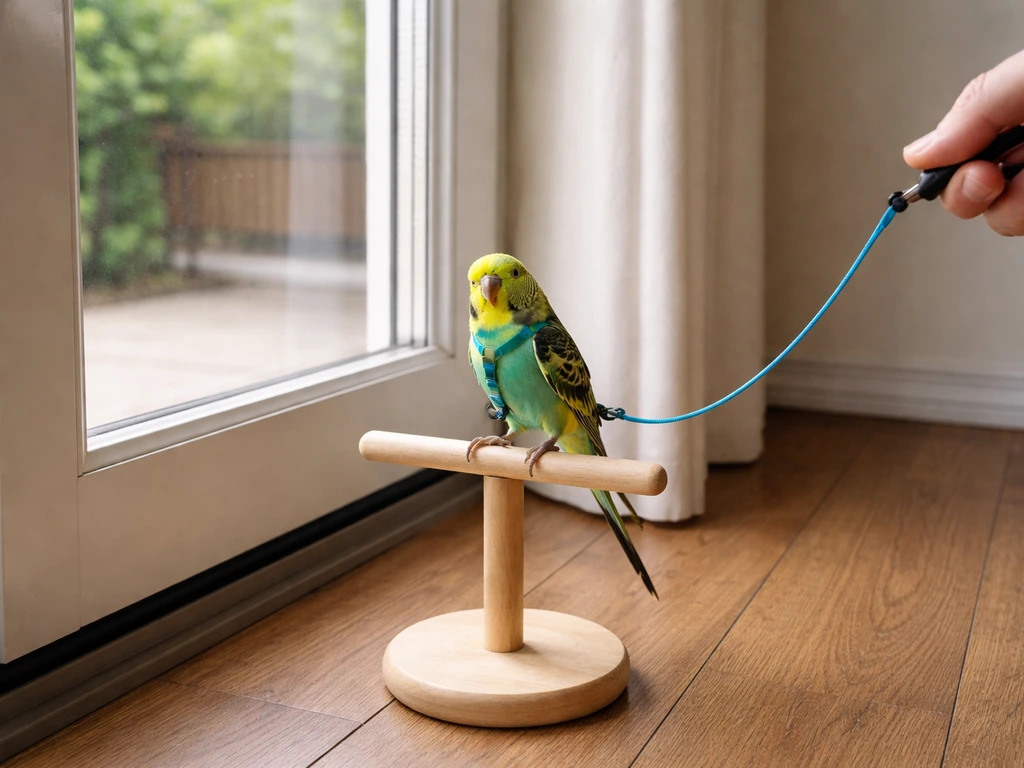
For loose-leash behavior indoors, hold the leash slack and let your bird explore a safe perch or area. The goal is to teach your bird that the leash does not restrict movement when it is not needed, and that a gentle tug means check in with you, not panic. Practice light leash tension by applying very gentle pressure and immediately rewarding the bird for turning toward you. Think of it as a very basic recall behavior on leash. If you want, you can also pair harness sessions with recall training so your bird learns to come when called in a safe, controlled way. Recall training can be practiced both indoors and during safe, controlled outings so your bird reliably comes when called.
Always end each session by removing the harness calmly and delivering a big reward. You want the removal to feel like a celebration, not a relief. That framing keeps future sessions positive. End every session while your bird is still interested and engaged, not after it has started showing fatigue or disinterest. Stopping while things are good is one of the most powerful tools in positive reinforcement training.
Handling readiness: body language, stress signals, and session structure
Reading your bird's body language accurately is the single most important skill in harness training. If you can catch early stress signals, you can end the session before things escalate, and that protects both your bird's welfare and your training progress.
Watch for these signs that your bird is comfortable and engaged: relaxed feathers, curious eye contact, voluntary approach toward you or the harness, soft vocalizations, and willingness to take treats. These are all green lights to continue.
Stop the session immediately and remove the harness as calmly as possible if you see any of these stress or danger signals:
- Open-mouth breathing or panting
- Tail bobbing with each breath
- Freezing completely still (not the relaxed stillness of a calm bird — this is rigid, wide-eyed stillness)
- Flailing, frantic wing-flapping, or falling off the perch
- Collapsing low on the perch or leaning heavily
- Feathers slicked tight against the body with a tense posture
- Biting hard and repeatedly, especially if this is new behavior
- Holding wings away from the body (possible heat stress)
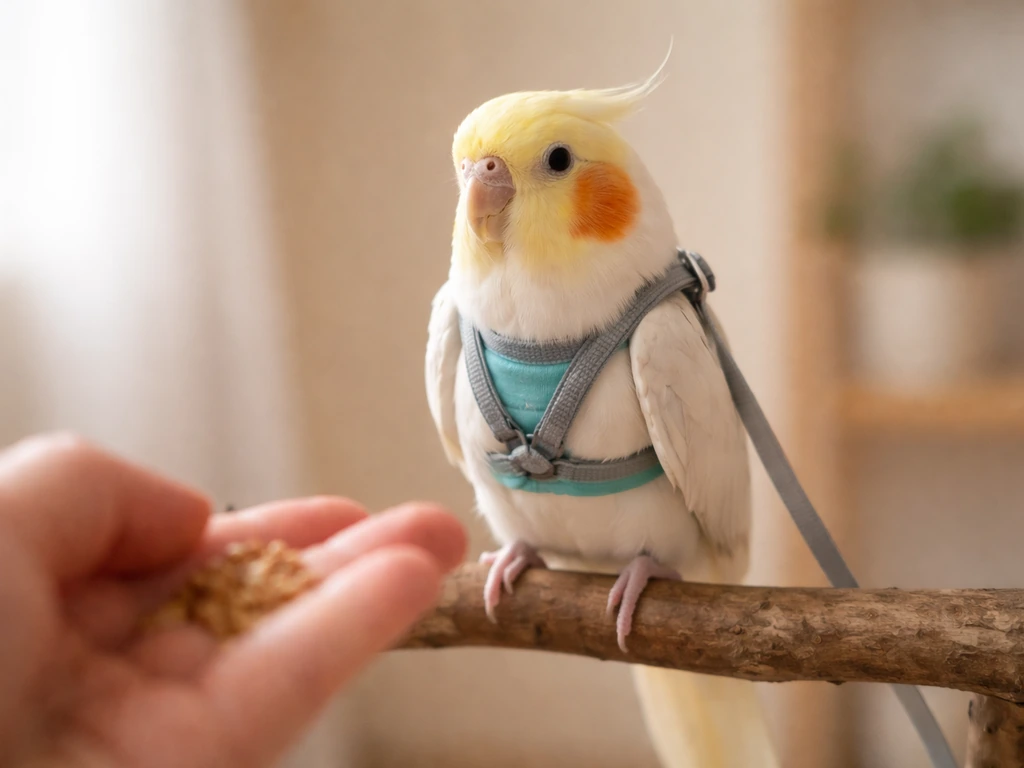
Session structure matters as much as the training itself. Keep sessions short: two to five minutes for early-stage training. Work in a quiet, familiar room with no other pets or distractions. Train before a meal so treats have higher value, and always at a time when your bird is naturally alert and active, not during nap time or after a stressful event. Once per day is plenty for most birds; two short sessions for birds that adapt quickly and enjoy training.
First outings safely: environment setup, leash control, and escape prevention
Your bird's first time outdoors in a harness should feel like nothing special to you, because you will have done all the real work indoors first. But it still requires careful environment setup on your end.
Choose a calm, familiar-ish environment for the first outing: your backyard, a quiet patio, or a calm park during off-peak hours. Avoid high-risk contexts including midday heat, strong wind, fireworks or loud machinery nearby, crowded public spaces, and areas with large birds of prey overhead. Go out in the early morning or late afternoon when temperatures are comfortable and the environment is quieter.
Keep the leash short and maintain a firm but relaxed grip. If your bird startles and bolts, a long leash means more momentum before the tug, which can injure the bird. Two to three feet of active leash length is a good working length for most outdoor sessions. Never loop the leash around your wrist or fingers in a way that could cause a jerk injury if the bird takes flight suddenly.
Escape prevention starts before you leave the house. Do a harness fit check every single time you go out: check that clips are secured, straps are not twisted, and that the harness cannot slip over the head. Even a harness that fit well yesterday should be checked fresh today, especially if your bird's feather condition has changed or it has had a recent molt.
Have an escape plan ready just in case. Make sure your bird is banded or microchipped with current contact information. Bring a familiar travel carrier and a towel on every outing. If the harness fails and your bird takes flight, having a carrier with familiar smells nearby and knowing your bird's recall behavior can be the difference between a scare and a tragedy. Building a solid recall response is a smart companion skill to develop alongside harness training.
Watch your bird's body language constantly during the first outing. Many birds do great indoors and then become overwhelmed by outdoor stimuli. Five to ten minutes outside is plenty for the first few outings. Come back inside while things are still going well.
Troubleshooting common harness-training problems by behavior
Almost everyone hits a wall somewhere in this process. Here are the most common problems and what to actually do about them.
Bird refuses to approach or look at the harness
You have moved too fast. Go back to Stage 1 and simply have the harness in the room without any attempt to interact with it. Pair every meal or treat session with the harness visible but at a distance. Gradually reduce the distance over days or even weeks. Patience here pays off enormously later.
Bird panics or flails when the harness touches its body
This usually means the bird is not comfortable with body touching in general, which is a handling foundation issue rather than a harness issue specifically. Take a step back and spend time on general body desensitization: gently touching wings, back, and chest during calm moments and pairing that with treats. Target training can be a useful parallel skill here because it builds voluntary participation and body confidence.
Bird chews or pulls at the harness straps
Some chewing is normal curiosity, especially at first. Redirect with a treat or a favorite toy immediately after putting the harness on so the bird's attention moves away from the harness itself. If chewing is persistent and vigorous, check the fit, discomfort or rubbing is a common cause. If the harness fits well and chewing continues, increase session enrichment so the bird has something more interesting to do than inspect its own harness.
Bird bites hard during harness fitting
Hard biting during fitting is a clear communication: this is too much, too fast. It is not bad behavior, it is important information. Stop, give the bird space, and revisit your desensitization plan. Are you rushing the head loop step? Is the room too noisy? Is your bird tired or hungry? Address the likely cause before the next session. Never punish biting during training, it will destroy trust and set you back significantly.
Bird preens or rubs against surfaces to remove the harness
A small amount of preening after the harness goes on is normal. If the preening is frantic or the bird is actively trying to scrape the harness off on perches, the harness is either uncomfortable or the bird has not yet fully accepted it. Check fit first. If fit is good, shorten sessions dramatically and increase treat frequency so the bird is focused on rewards, not the harness.
Harness slips or rotates out of position
A rotating or slipping harness almost always means the size is slightly off or straps are not adjusted correctly. Re-measure your bird and revisit the manufacturer's sizing chart. Also check whether a molt has changed your bird's body shape, this happens more than people expect, particularly after a heavy molt.
Regression after previous progress
Regression is common and frustrating, but it is not permanent. It usually follows a stressful event (illness, a scary outdoor experience, a change in household), or it means you progressed through stages too quickly and the earlier steps were not as solid as they seemed. Treat a regression the same way you treat a new bird: go back to the last comfortable stage and rebuild from there. Do not be too proud to start from Stage 2 again, you will move through it much faster the second time.
Harness tangling during movement
If your bird tends to spin or flip on the leash, the leash line can tangle. Keep your leash short and stay attentive. If tangling happens, calmly stop all movement, support your bird gently, and carefully untwist. After the session, consider whether a different harness style or leash length might reduce this risk. A shorter, stiffer leash is often better than a long, whippy cord for birds that move a lot.
Species- and skill-level adjustments (pet vs rehabilitation/wild care)
Not all birds are the same, and harness training strategy should reflect that. Here is how to calibrate your approach based on species and your own experience level.
Beginner owners with commonly kept pet parrots
If you are new to bird training and working with a cockatiel, a small conure, or a budgerigar, start with the most gradual desensitization plan and do not skip any stages. Cockatiels in particular can be sensitive to restraint and show stress quickly, so very short sessions (one to two minutes) and high treat frequency are essential. PangoVet's veterinary guidance on cockatiels specifically recommends abandoning the harness strategy entirely if the bird consistently shows stress, which is sound advice for any small species. Prioritize the bird's comfort over any timeline.
Intermediate owners with medium to large parrots
African greys, Amazons, caiques, and mid-size conures often respond well to harness training when they already have a solid handling foundation. African greys in particular tend to be cautious and observational, they often need more time at the 'harness in the room' stage before making any move toward it, but once they accept the harness, they can be remarkably consistent. HARI's structured, stage-based approach aligns well with how greys learn: methodical, criteria-based, no rushing.
Experienced owners with large parrots (macaws, cockatoos)
Larger parrots can get harness-trained to a high level of comfort, but the stakes for getting the fit and technique right are higher because a panicked large macaw or cockatoo can self-injure significantly. If you are experienced, you may be able to move through early stages faster, but always let your individual bird set the pace. Some breeders begin very early harness exposure around five to six weeks of age as part of a structured early-education program, which can produce remarkably harness-friendly adults, but this is expert territory, not a beginner technique.
Wild and rehabilitation birds
Standard harness training as described in this guide is designed for tame, handleable pet birds. Wild or rehabilitation birds present a fundamentally different situation. A wild bird in a harness cannot give meaningful behavioral consent the way a tame, socialized bird can, and handling stress in a rehabilitation context carries real medical risk. If you are a wildlife rehabilitator considering a harness for a specific therapeutic or exercise purpose, that decision should be made in consultation with a licensed wildlife vet, not adapted from general pet training guidance. There are also important legal considerations: possessing and handling wild birds, including raptors, songbirds, and waterfowl, requires appropriate federal and state permits in the United States and similar licensing frameworks in other countries.
The throughline for every species and skill level is the same: your bird's behavioral and physical comfort is the only real measure of progress. A harness worn calmly in a healthy, happy bird is a wonderful enrichment tool. A harness forced onto a stressed bird is just a restraint. The difference between those two outcomes is entirely in the process, and the process is exactly what this guide is for.
FAQ
When should I do a harness fit check, and what should I verify before every outing?
Avoid testing the harness “in a hurry” right before stepping outside. Do a full fit check at the door (clips secure, straps not twisted, one to two fingers under the body straps, no throat pressure), then put the bird back on a familiar perch for two to five minutes with treats before leaving. If anything feels off on that recheck, do not go out yet.
My bird keeps chewing the harness, is that normal and what should I do?
Yes, but only in a controlled, positive way. If your bird starts to chew or scrabble at the harness, interrupt with a high-value treat or toy and redirect attention back to you, rather than removing the harness immediately. If the chewing turns into vigorous scraping or frantic preening, that is a sign of discomfort or overload, then you should end the session and re-check fit and session duration.
How do I know when to reduce treats once my bird accepts the harness?
Short sessions are best, but you can still “fade” treats over time. A common approach is to reward heavily at the start of a session (when the bird is calm with the harness in place), then gradually reduce frequency once the bird is steady for several repetitions. If stress signals appear, increase treats again and pause the reduction until the bird maintains relaxed behavior.
What counts as a “stop now” signal during leash work, and what should I do next?
If you notice foot dragging, flapping to escape, repeated attempts to climb over the leash, or a sudden refusal to move forward, stop and end on a calm note (remove harness calmly, big reward). Then return to the last successful stage indoors with the leash slack for loose behavior training before trying outdoors again. These behaviors often mean the environment is too stimulating or the leash length is working against the bird.
Can I clip the leash anywhere on the harness, or does placement matter?
Yes. Avoid clipping the leash to the wrong point or to the harness in a way that changes strap pressure. Only use the attachment the harness is designed for, and after clipping give your bird a brief moment to adjust on a perch before any movement outside. Also confirm the leash can release tangles by staying straight and not wrapped around perches.
My bird gets really excited or panicky at the door, how do I handle that?
If your bird tries to rush the door when the harness is on, the issue is usually context and arousal. Practice “door calm” indoors first (harness on, approach the door briefly, treat for staying still, leave again), then build the outdoor step gradually. Keep outings very short at first (minutes, not long walks) and return while the bird is still curious rather than fully overstimulated.
What should I do if my bird keeps trying to scrape the harness off?
If you consistently see frantic scratching to remove the harness, that is often fit or rubbing, especially after a molt or if feathers have changed. Re-measure and match all three measurements to the specific brand sizing chart, then check that straps do not twist and that the harness cannot rotate over the head. If fit is correct but behavior persists, shorten sessions drastically and increase treat frequency, since some birds need longer counterconditioning before they tolerate body contact.
Is it okay to leave the harness on longer to speed up training?
No. Even if the bird looks calm, a long indoor “wear time” can backfire if the bird is tolerating it rather than enjoying it. Aim for short, successful intervals that end while interest is still high, then gradually extend only when the bird shows consistent relaxed body language. If your bird starts vocalizing sharply, panting, hiding in a corner, or repeatedly stiffening, remove the harness and return to earlier stages.
What are safe leash-handling rules, especially if my bird spins or bolts?
Choose a leash length that prevents momentum if the bird startles (often two to three feet for first outdoors). You should never loop the leash around your wrist or fingers, and you should keep a stable, forward-facing stance so you can stop movement smoothly. If your bird flips or spins, stop, gently support, carefully untwist, and consider a different leash style or shorter, stiffer leash.
My bird seems stressed or unwell during training, when should I involve a vet?
Stop and consult an avian vet first if your bird has recent illness, unexplained lethargy, breathing changes, wing clumsiness, or signs of pain when touched. Stress responses can temporarily worsen underlying conditions, so it is safer to assess medically before assuming it is “just training.” If cleared medically, you can resume at the last comfortable stage with shorter sessions and higher treat value.
Should I practice recall before taking my bird outdoors in a harness?
Use your recall behavior as a safety backstop, but do not rely on calling as “permission” to escape control. Outdoors, keep the first sessions short, avoid high-risk stimulus areas, and maintain a leash length that allows you to quickly prevent a dash. If your bird does not respond reliably indoors yet, delay outdoor outings until you have practiced coming on leash and can reinforce immediately.
How should I end a session to avoid accidentally reinforcing panic?
When you remove the harness, your goal is to keep the bird’s emotional state positive. Remove smoothly, without fumbling, and reward immediately. If you remove the harness when the bird is still escalating or struggling, you might accidentally teach “fight equals release.” Aim to end at the moment the bird is calm and engaged so the harness becomes associated with structured, predictable sessions.