Breeding quail is genuinely one of the most beginner-friendly bird breeding projects you can take on. They mature fast, lay reliably, and with the right setup you can go from a pair of adults to a full hatch of chicks in under three weeks. The key is having a clear plan before you start: the right species for your goals, proper housing, a solid incubation routine, and a brooder that keeps chicks safe from the moment they pip. This guide walks you through every step, in order, with practical numbers and welfare-first advice throughout.
How to Breed Quail Birds: Step by Step for Success

Maya Harris
12 Apr 2026
Choosing your quail species and being clear about your goals
Your first decision is species, and it shapes everything else. Coturnix quail (also called Japanese quail) are the best starting point for almost everyone. They reach sexual maturity at around 6–8 weeks, lay prolifically, tolerate handling well with patient socialization, and their eggs incubate in roughly 17–18 days. If you want a breeding flock up and running quickly, Coturnix is the answer.
Bobwhite quail take longer to mature and have a longer incubation period, but they're a popular choice if you're raising birds for a specific regional or conservation purpose. Button quail are charming and popular as pets, but their eggs are tiny, which creates real challenges for artificial incubation, and they don't reach maturity until about 12–16 weeks with clutches of only around 4–8 eggs. If you're just starting out, skip button quail for your first breeding project.
Before you buy a single bird, decide what success looks like for you. Are you building a small pet flock and want occasional chicks for companionship and bonding? Are you rehoming chicks to other enthusiasts? Or are you trying to increase a breeding population more systematically? Your goal determines how many birds you need, what housing you set up, and how much incubation equipment makes sense. If you're curious how these decisions apply to other species, the same goal-setting logic covered in a general guide to bird breeding applies directly here. Get your "why" clear first, then build your setup around it.
Housing, ventilation, nesting, and the gear you actually need

Quail don't need a lot of space per bird, but they absolutely need the right kind of space. For Coturnix, plan for at least 1 square foot per bird in a wire-bottomed cage, or more if you're using a floor-based aviary setup. Wire floors help keep droppings away from the birds but must have small enough mesh (no larger than 1/4-inch openings) so feet don't slip through. Good ventilation is non-negotiable: stale air is a fast route to respiratory illness. Make sure your housing has cross-flow airflow without cold drafts blowing directly on the birds, especially in winter.
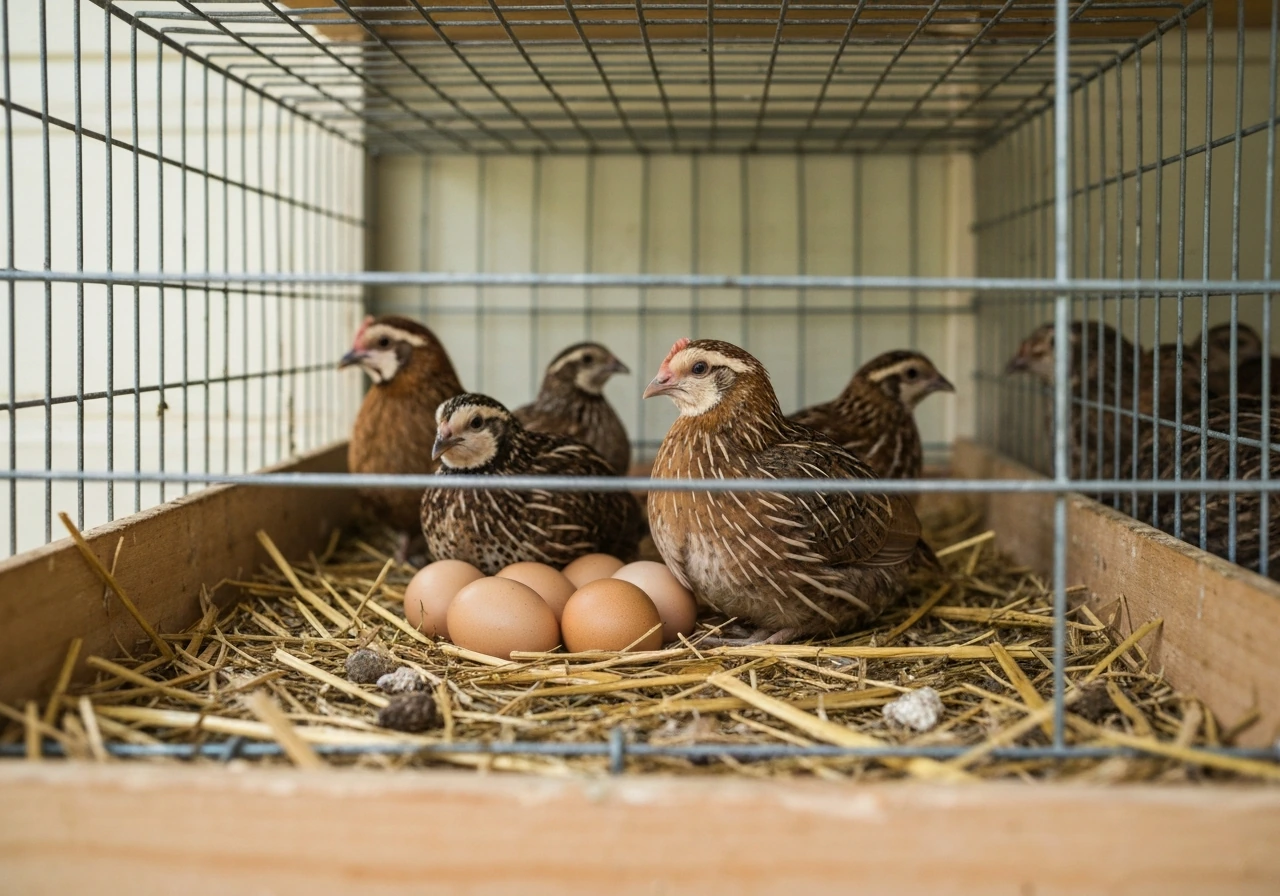
Quail are ground-dwelling birds and don't use elevated perches the way parrots or songbirds do. Nesting for Coturnix in a breeding setup is simple: they'll often lay directly on the floor or in a shallow nest box with a few inches of hay, shredded paper, or sand. Provide low hiding spots or visual barriers between birds to reduce stress, especially if you notice females being over-pursued by males. Predator protection matters even indoors: secure latches, solid construction, and no gaps larger than 1/2 inch are the baseline. If your birds are housed outdoors, hardware cloth rather than chicken wire is the minimum acceptable standard.
- Wire-bottomed or solid-floor cage/aviary: at least 1 sq ft per bird for Coturnix
- Small-mesh flooring (1/4-inch max) to prevent foot injuries
- Cross-flow ventilation with no direct drafts
- Shallow nest boxes or floor nesting areas with hay, sand, or shredded paper
- Visual dividers or hides to reduce male aggression stress on females
- Hardware cloth (not chicken wire) for outdoor runs
- Secure latching on all doors and panels
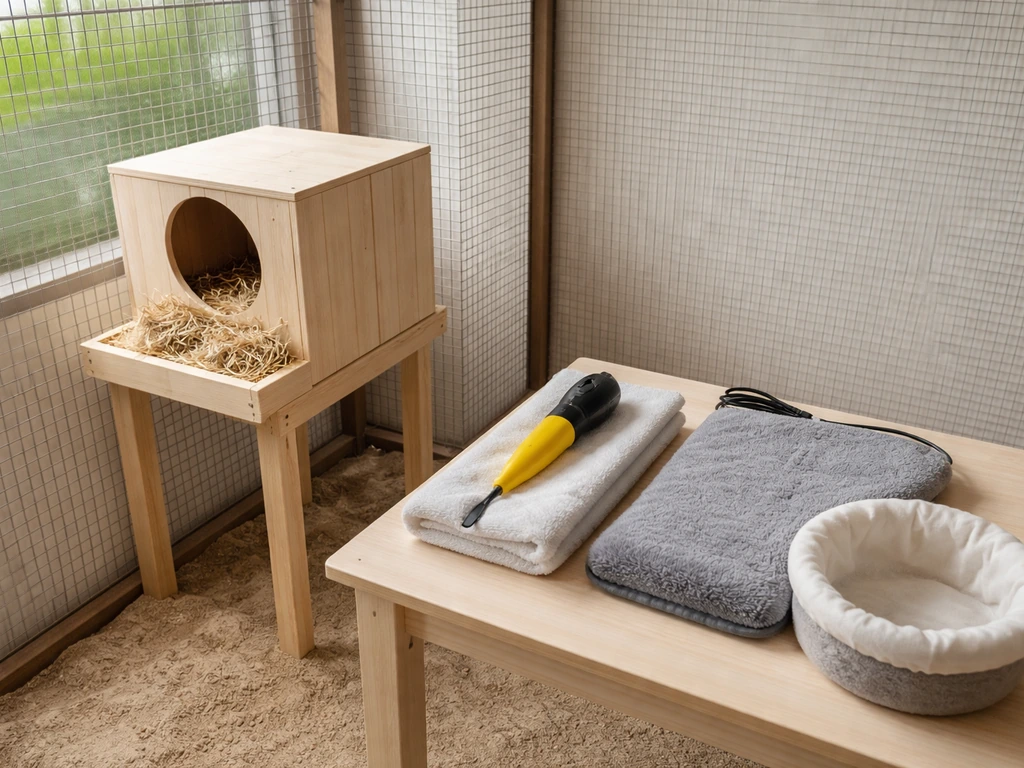
For equipment, you'll need a reliable thermometer/hygrometer inside the housing, food and water dispensers sized for quail (standard chicken feeders are often too large), and if you plan to collect eggs for incubation, a clean egg collection container and a pencil for marking egg orientation. An incubator and brooder are covered in their own sections below, but buy or build those before your first eggs are due, not after.
Setting up your breeding group: pairs, ratios, and reading courtship
Pair selection makes a bigger difference than most beginners expect. Choose birds that are alert, bright-eyed, fully feathered, and free of any signs of respiratory distress or limping. Avoid pairing closely related birds if you can trace your flock's lineage. For Coturnix, the standard mating ratio is one male to two or three females. Running a single pair works but can lead to the female being overmated and stressed. One male to more than four females often results in reduced fertility because he can't keep up with all the eggs being produced.
Normal Coturnix courtship looks and sounds pretty lively. The male will crow (a distinctive "cu-cu-ROOO" call), chase the female, and perform a chest-puffed display. Actual mating is quick, the male mounts and dismounts in seconds. You'll know a pair is bonding when the female tolerates his presence without constant alarm running.
Watch for over-mating signs: bare patches on the female's head or back from the male gripping her, or a female that's always hiding or panting. If you see those signs, temporarily separate the male or add more females to dilute his attention. This kind of attentive monitoring is central to the welfare-first approach emphasized throughout this site, similar to the careful pair management described in conure bird breeding tips, where stress on the breeding pair directly affects success.
Allow at least one to two weeks after introducing your breeding group before you start collecting eggs for incubation. Early eggs from a newly introduced pair may have lower fertility as the birds settle into their social dynamic. Once the pair is established and mating regularly, fertility rates in healthy Coturnix are typically high, often 80–95% in a well-managed flock.
Egg incubation: temperature, humidity, turning, and candling

Collect eggs daily and store them pointed-end down at around 55–65°F if you're not incubating immediately. Don't wash them (washing removes the natural protective bloom), and don't store them more than 7–10 days before incubating or hatchability drops noticeably. When you're ready to start, mark each egg with a pencil X on one side so you can track turning orientation if you're hand-turning.
For Coturnix, set your incubator to 99. 5°F (forced-air incubator) or 101–102°F (still-air incubator).
Humidity for the first 15 days should sit around 45–55% relative humidity. Some sources suggest up to 60% early on if your environment is very dry, but erring slightly lower is safer than too high, which causes embryos to drown in excess fluid.
On day 15, raise humidity to the lockdown range of 65–75% and stop turning the eggs. Hatch typically begins around day 17 and can run as late as day 20 depending on your incubator's actual temperature consistency. Don't panic if a chick hasn't hatched by day 17, let it run to day 20 before giving up.
One important note from the research: short temperature fluctuations during incubation affect hatchability less than you might fear, because embryos respond more slowly to temperature changes than the air inside the incubator does. That said, keep your incubator away from drafts, direct sunlight, and heating vents to minimize swings.
| Phase | Days | Temperature (forced air) | Humidity (RH) | Turning |
|---|---|---|---|---|
| Incubation | 1–15 | 99.5°F | 45–55% | Every 2–4 hours (hand) or auto-turner |
| Lockdown | 15–17 | 99.5°F | 65–75% | Stop turning on day 15 |
| Hatch window | 17–20 | 99.5°F | 65–75% | No turning; do not open incubator |
If you're hand-turning, turn eggs at least 3 times a day (an odd number of turns means the egg rests on a different side each night). Turning every 2–4 hours during the day is even better. Stop all turning on day 15 and move eggs to the bottom of the incubator (or a hatcher tray) so chicks have room to move when they pip.
Candling is optional but helpful: at day 7–10, hold a small flashlight against each egg in a darkened room. A developing embryo shows a dark mass with visible veins spreading from it. A clear egg or one that has a detached air cell is likely infertile or has died early. This is a low-cost, low-stress check that tells you a lot about whether your breeding group is actually fertile.
If you want a deeper look at the egg development process, the article on how to get bird eggs covers collection, storage, and fertility assessment in more detail.
Hatch day and the first 48 hours
Resist the urge to help chicks out of their shells. "Assisting" a hatch almost always does more harm than good. A chick that has internally pipped (broken through the air cell) but hasn't externally pipped yet is still absorbing the yolk sac, and opening the shell too early causes bleeding and death. Let nature drive this process. Keep the incubator closed during hatch to maintain humidity. Chicks can survive 24–48 hours on absorbed yolk after hatching, so you don't need to rush them into the brooder the moment they fluff up. Once a majority have hatched and dried, move them together to a pre-warmed brooder.
Brooder setup, feeding, and keeping chicks safe
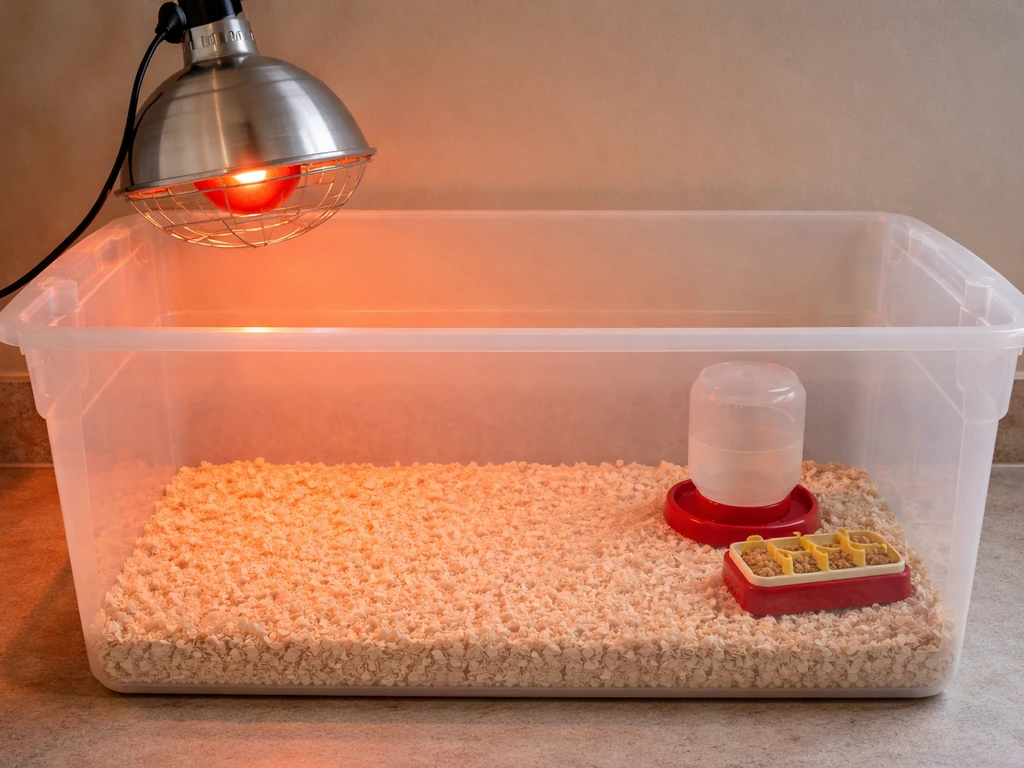
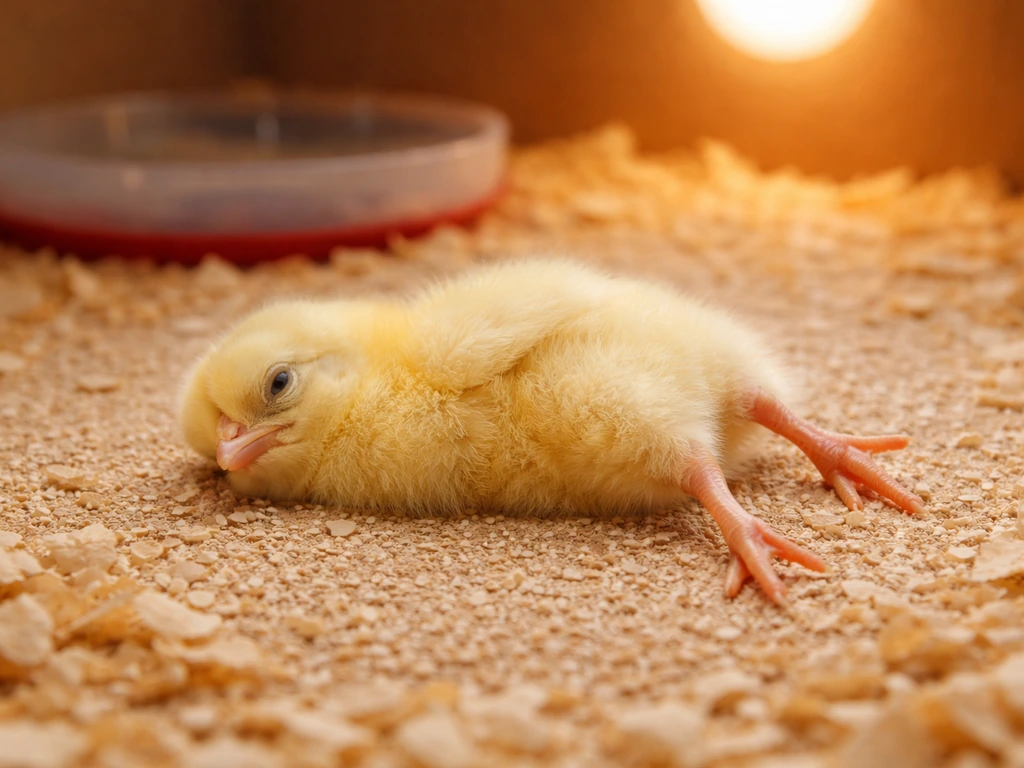
Your brooder needs to be warm, draft-free, and ready before the first chick hatches. A simple brooder can be a plastic storage tote or wooden box with a heat source at one end and enough room for chicks to move away from heat if they get too warm. Start the brooder temperature at 90–95°F at chick level in week one, then drop it by about 5°F each week as chicks feather out. Use a thermometer: don't guess. Chicks that pile on top of each other are too cold; chicks that press against the walls away from the heat source are too hot. Both states are dangerous.
Floor surface is one of the most overlooked safety details in chick brooding. Slick surfaces like bare cardboard, plastic, or smooth wood cause splayed leg (spraddle leg), a condition where a chick's legs splay outward from the body due to tendon damage from slipping. It's often permanent. Cover the brooder floor with paper towels for at least the first week. Avoid sawdust, fine shavings, or small-particle litter early on: chicks will eat it and can develop impacted crops. After the first week, you can transition to larger-particle pine shavings once chicks are better coordinated and less likely to confuse bedding with food.
Space matters from day one. Plan for about 0.1 square feet per chick initially, expanding as they grow. Overcrowding leads to piling, which is a real chick mortality risk, and it accelerates the buildup of ammonia from droppings. Change bedding frequently and keep the brooder dry.
For feed, use a gamebird starter crumble with a crude protein content of around 24–26%. This high-protein diet is critical in the first 6 weeks while chicks are growing rapidly. Standard chick starter formulated for chickens is typically too low in protein for quail and will slow development. Make sure crumbles are fine enough for tiny quail bills: if the pieces are too large, crush them slightly.
For water, use a quail-specific or chick-specific waterer with a very shallow trough or marbles placed in the water dish to prevent drowning. Newly hatched Coturnix chicks are astonishingly small and can drown in surprisingly little water. The extra step of adding marbles or pebbles to the water base takes 30 seconds and saves lives.
- Brooder temperature: 90–95°F week 1, reduce by 5°F each week
- Paper towel floor covering for minimum the first 7 days
- No sawdust or fine litter until week 2 minimum
- Gamebird starter crumble: 24–26% crude protein
- Quail-specific waterer with shallow trough or marbles to prevent drowning
- ~0.1 sq ft per chick initially, expanding as birds grow
- Brooder pre-warmed at least 1 hour before chicks arrive
Health, welfare, and humane handling during the breeding process
Quail are prey animals and their stress response is fast and intense. Sudden loud noises, unfamiliar smells, and rough handling can all cause what's sometimes called "quail panic," where birds scatter and slam into cage walls. Minimize this by approaching cages calmly, making quiet sounds before reaching in, and keeping the breeding area in a low-traffic part of your home or property. This isn't just about being kind, chronic stress directly suppresses egg production and fertility.
When you need to handle adults for health checks or setup changes, cup the bird gently with both hands and keep the wings secure against the body. Never grab by the legs. Hold birds close to your body for warmth and security, and keep handling sessions short during the breeding period. Bonding with your quail through consistent calm presence and hand-feeding treats (mealworms are particularly motivating) builds trust over time and makes health checks much less stressful for both of you. This welfare-centered, gradual trust-building approach mirrors techniques used in love bird breeding tips, where building a calm relationship with breeding pairs is just as important as the technical setup.
On the disease side, quail are susceptible to a few key conditions worth knowing. Ulcerative enteritis (sometimes called "quail disease") is a bacterial infection of the small intestine that spreads quickly in stressed or crowded flocks. Signs include sudden death, bloody droppings, and lethargy. Coccidiosis is a common cause of death in young birds: look for ruffled feathers, huddling, and bloody droppings in chicks 2–8 weeks old.
Respiratory diseases including Mycoplasma-related infections can show as rattling breathing, nasal discharge, and head shaking. External parasites like lice and mites are worth checking for regularly: part the feathers near the vent and under the wings to check for small moving insects or white egg clusters at feather bases. Address any of these early.
Biosecurity is the unglamorous but critical backbone of flock health. Keep visitors away from your breeding area, change shoes or use dedicated footwear before entering, clean and disinfect equipment regularly, and quarantine any new birds for at least 2–3 weeks before introducing them to your established flock. Thinking through your population management strategy is also worth the time: the principles behind how to increase bird population responsibly apply directly to deciding how many chicks to hatch versus how many breeding adults to maintain for long-term flock health.
One thing to be clear about: pinioning or any permanent physical alteration is not appropriate for quail kept in a standard breeding or pet context. If you ever encounter guidance suggesting it, the article on how to pinion a bird explains the specific (and very narrow) contexts where the procedure is used and why it's not a general husbandry tool.
Troubleshooting: low fertility, eggs that won't hatch, and chick losses
Most eggs are clear or infertile after candling
If candling at day 7–10 shows mostly clear eggs, start by ruling out male-to-female ratio problems (is your ratio 1:2 or 1:3, not 1:6 or solo female?). Check that your male is actively mating: if you've never seen him mount a female, observe quietly for 30 minutes during the morning activity peak. Also check male age: males under 6 weeks or over 2 years old may have reduced fertility. Diet matters too: a protein-deficient diet or vitamin E/selenium deficiency will crater fertility. Switching to a quality gamebird breeder diet sometimes fixes this within 2 weeks. Finally, confirm eggs were stored correctly (not refrigerated, not older than 10 days) before incubating.
Eggs show development but stop before hatch
Embryo death mid-incubation usually points to one of three things: temperature inconsistency, humidity problems, or poor egg quality from nutritional deficiencies in the breeding flock. Verify your incubator thermometer against a second thermometer: cheap built-in thermometers are often off by 2–3°F, which is enough to cause late embryo death. Check that humidity didn't drop too low during the first two weeks (below 40% RH in a dry climate is risky). If your incubator has hot or cold spots, try rotating egg positions daily. For eggs that internally pip but fail to externally pip, the most common cause is humidity that's too low during lockdown, causing the membrane to dry and stick to the chick.
High chick mortality in the first week
Chick losses in the first 7 days almost always trace back to four sources: wrong brooder temperature, slick flooring causing leg injuries, drowning in water dishes, and nutritional problems from using the wrong feed. Go through this checklist if you're losing chicks early: Is your thermometer calibrated and placed at chick level (not at the lamp)? Is the floor covered with paper towels, not bare plastic? Are you using a quail-specific shallow waterer? Is your feed 24–26% protein gamebird starter, not chick starter or layer pellets? Fixing any of these can turn a struggling hatch into a thriving one. If chicks are dying at 2–4 weeks with bloody droppings, suspect coccidiosis and contact a avian vet for appropriate treatment guidance.
Splayed leg in hatchlings
If chicks hatch with one or both legs splayed outward and can't stand, act within the first 24–48 hours for the best chance of correction. The cause is almost always a slick surface in the incubator hatcher tray or brooder. For mild cases, a small "hobble" made from a bandage or medical tape placed between the legs at the correct width (roughly the natural hip-width apart) for 24–48 hours can help realign the leg position as tendons normalize. Remove the hobble and reassess. Prevent this in future hatches by lining hatcher trays with a non-slip shelf liner cut to fit.
Breeding quail successfully is genuinely achievable for anyone willing to invest in the right setup and pay attention to the birds rather than just the equipment. The species is forgiving, the learning curve is short, and the reward of watching a hatch of tiny Coturnix chicks tumble out of their shells is hard to beat. The same careful, welfare-first thinking that makes a good quail breeder also makes a good keeper of any bird species. If you're considering expanding to other species once you've got your quail routine down, articles on java bird breeding tips and even more ambitious projects like how to start emu bird farming cover the same foundational principles scaled to very different birds.
FAQ
Can I incubate quail eggs in the same room where my adults are housed?
Yes, but plan for timing and hygiene. If you house adults in the same area as incubator and brooder, keep strict workflow order (clean incubator, then clean brooder, then adults), change footwear or sanitize hands between zones, and disinfect egg trays and waterers. Even a well-managed flock can spread coccidia or respiratory agents to chicks, so consider separate equipment for each life stage.
What should I do if most Coturnix eggs hatch after day 17?
If you are seeing chicks pip late, do not open the incubator. Let the hatch run to day 20, then remove chicks only after they are dry and active. Opening early drops humidity and can cause membrane drying, which increases early deaths during the first 1 to 2 days.
Do I need to candle to decide when to stop turning quail eggs?
Plan to keep turning until day 15 even if embryos seem to be developing. The turning routine affects proper membrane attachment and helps prevent sticking. Once you enter lockdown, stop turning completely and move eggs to the hatcher area so chicks can reposition at pipping.
How do I handle an incubator power outage during incubation?
Yes, but avoid using broad “hatching hacks” like cooling eggs or misting. If power goes out, the safest move is to keep the incubator closed and stable as long as possible, then gradually re-stabilize temperature once power returns. If your outage lasts long enough that temperature has clearly drifted for hours, hatch success usually drops, so be prepared for a smaller hatch and focus on brooder safety for any survivors.
My incubator has no fan, what changes for temperature and egg rotation?
Use different targets if you have forced-air versus still-air equipment. Forced-air incubators often tolerate the same temperature consistently, but still-air setups can develop hot or cold pockets more easily, so prioritize verifying your thermometer reading at egg level and, if needed, rotate eggs daily during mid-incubation.
What ratio should I use if I want consistent fertility, not just occasional chicks?
For Coturnix, a handy rule is to aim for about 1 male with 2 to 3 females for most small flocks. If you run a single pair, fertility can drop because the male may not cover every egg in peak laying windows, and if you run too many females per male you can create stress and reduced fertility.
If candling shows infertile eggs, what’s the most likely cause besides incubation settings?
Age and condition matter. If your male is under 6 weeks, over 2 years, or showing any respiratory signs, expect lower fertility. Also recheck diet quality and confirm eggs were stored warm and stable enough before incubation, not refrigerated or held too long.
When is it safe to move chicks into the brooder, and should I separate them by size?
Do it carefully and only when needed. Remove chicks from the incubator after most are fully dry and warmed, group them into the brooder, and keep handling minimal. If you separate damp chicks too early, chilling and leg issues become more likely, especially if brooder temperature is still adjusting.
Can I use pine shavings from day one in the brooder?
Yes, but only if you can guarantee dryness and non-slip footing. Large shavings too early can increase spraddle leg risk and chicks may peck bedding. For the first week, use paper towels or another non-slip, low-ingestion-risk surface, then transition gradually once coordination is better.
How should I troubleshoot humidity if chicks are hatching but the brooder area stays damp?
It depends on humidity, ventilation, and chick stress level, but a practical approach is to adjust slowly. If you are seeing sticky feet, increased bedding clumping, or very wet droppings, improve airflow and avoid raising humidity beyond the lockdown target. If chicks are chirping normally and bedding stays reasonably dry, small deviations are usually less dangerous than large swings.
How do I prevent drowning when my chicks are tiny and keep knocking over water?
Keep the waterer extremely shallow and include marbles or a similar safe insert to prevent drowning. Even with safe waterers, check frequently for wet chicks and wet bedding, because soaked chicks chill quickly. Replace water at least daily, and scrub and dry waterers to reduce bacterial buildup.
What should I do if my quail start slamming into the cage walls during breeding?
Quail panic usually responds better to prevention than correction. Reduce sudden movements, keep the room quieter, and avoid rearranging cages during active breeding windows. If a bird is already panicking, do not chase it repeatedly, dim lights slightly if feasible, and restore a calm routine for a few days to allow egg production to recover.
How often should I inspect quail for disease and parasites during breeding?
A “basic” quail health check schedule helps you catch problems early enough to prevent flock-wide spread. At minimum, do quick checks daily during incubation and brooding for breathing changes, limping, droppings quality, and signs of parasites around the vent. If you notice coccidiosis signs in chicks, pause new introductions and consider avian vet guidance before continuing breeding.
Is pinioning necessary to keep quail from escaping or fighting?
Quail breeding does not require wing alteration in a standard husbandry context. If a seller or forum recommends pinioning, treat it as a red flag and prioritize proper housing, predator protection, and stress reduction instead, since welfare risks and legal considerations vary.